

It’s May 2026 and several of my WooCommerce hosting clients have raised concerns that outgoing emails aren’t reaching their customers. After investigating the problem, the cause was found to be that Microsoft’s email servers rejects emails from my email servers, when Microsoft manage emails for that domain. In short – although the client domains had proper SPF and DMARC DNS records, the DKIM was controlled by Microsoft.
The solution: I decided to build a plugin that uses a non-default DKIM selector, so we can add a website-specific DKIM signature to all emails leaving any WordPress website.
- Microsoft:
default._domainkey.example.com - Our DKIM:
website._domainkey.example.com
How it works
The plugin hooks into the standard WordPress wp_mail() function and adds a DKIM signature to every outbound email. The site owner generates a DKIM keypair in the admin area, creates a DKIM DNS (TXT) record, and the plugin handles the rest.
The signature is cryptographic, so if someone tampers with the email in transit, the signature breaks and the email is rejected by the destination server. That’s exactly what email providers are looking for.
Set up the WPMail DKIM plugin
Step 1: Install and activate
Download the latest release of WPMail DKIM (zip), upload it to your WordPress site, and activate it. Navigate to Settings → WP Mail DKIM.
Step 2: Configure the signing domain
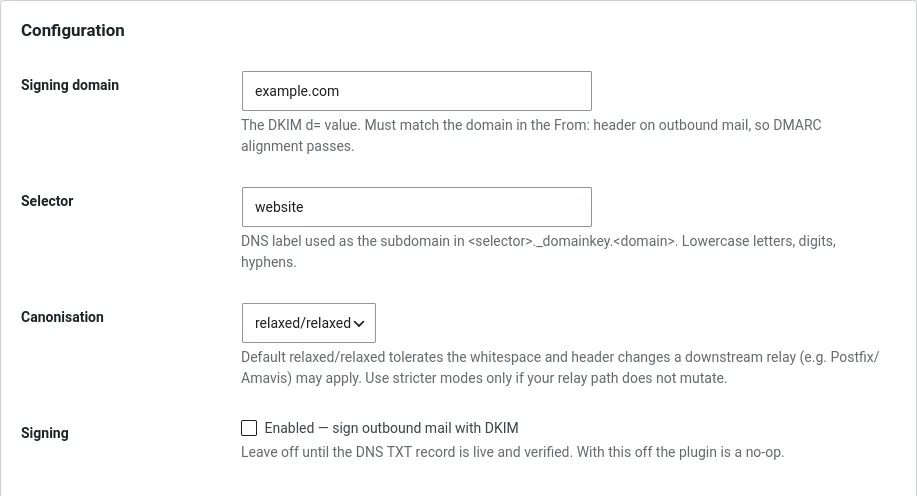
The plugin shows you four fields. Leave them at their defaults:
- Signing domain: Your website’s domain (e.g.
example.com). This must match the domain in your email “From:” header. - Selector:
website(the DNS label that identifies this key). - Canonicalisation:
relaxed/relaxed(tolerates minor changes as mail passes through relays). - Signing: Leave this unchecked for now.
Click Save settings.
Step 3: Generate the key pair
Click Generate key pair. The plugin creates a fresh RSA-2048 keypair and stores it securely. Once generated, you’ll see a DNS record block.
Step 4: Publish the DNS TXT record
This is where most people stumble. Your DNS provider’s interface will ask for a “Host” or “Name” field. The plugin shows you exactly what to paste:
Host name: website._domainkey (without your domain)
Paste this into the Host field. Your DNS provider will automatically append your domain to produce the final record name website._domainkey.example.com.
Important: Do not paste the full record name website._domainkey.example.com into the Host field. Most DNS providers will append your domain automatically, resulting in a doubled zone: website._domainkey.example.com.example.com. That won’t work.
For the value, copy the entire string starting with v=DKIM1 from the plugin.
Set the record type to TXT and save it.
Step 5: Verify the DNS record
Wait a few minutes for DNS to propagate. Then you can verify the record is live using this command:
# Check the DKIM TXT record exists now.
dig +short TXT website._domainkey.example.com
Replace example.com with your actual domain. If the record is live, you’ll see the public key. If you see nothing, the record either hasn’t propagated yet, or it’s been set up with the wrong name (check for the doubled zone problem above).
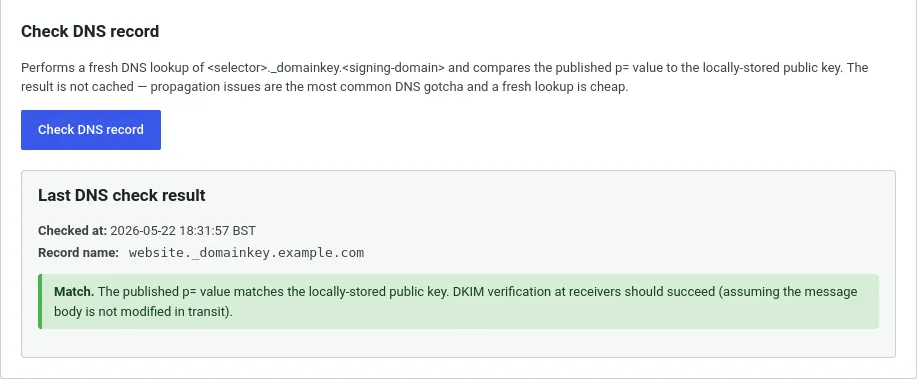
You can also click Check DNS Record in the plugin’s Verify tab. The plugin will tell you if the record matches the key it generated locally.
Step 6: Enable signing
Once the DNS record is verified, go back to the Setup tab, tick Enabled — sign outbound mail with DKIM, and click Save settings.

The plugin is now active.
Step 7: Test it
Send a test email to an external mailbox you control — Gmail, Outlook, whatever. Open that email and look at the headers. You’re looking for the Authentication-Results: header. On Outlook or Microsoft 365, it should say something like:
dkim=pass
spf=pass
dmarc=pass
compauth=pass reason=100
If it says “dkim=pass”, you’re good-to-go!
Things to look out for
The plugin signs outbound email by hooking the WordPress wp_mail() function. If a plugin or theme bypasses that function and uses raw PHP mail() or its own SMTP library, those emails won’t be signed. Most plugins don’t do that, so the plugin should work fine on most sites.
The plugin also doesn’t handle multiple domains within a single WordPress site. One key, one domain. If you need to sign mail for multiple domains, you’ll need a separate WordPress site (or a more complex setup).
Thanks Paul, this was a big help to us!
Cheers Bill.
I’m still amazed this plugin didn’t exist already. Perhaps it does, and I was just searching with the wrong terms. Anyway – I’m glad it helps. I’m rolling it out to several other clients now, too.