
Learn how to connect a WordPress/WooCommerce site to BunnyNet CDN. This procedure covers DNS settings, SSL, CORS, HTTP Headers and testing. It is somewhat technical, but there is no code involved.
Suggestion: I highly recommend you read the procedure from start-to-finish before you start configuring your site.
Info: We have no affiliation with BunnyNet. I’ve written this guide because BunnyNet is my preferred CDN provider, and I need a repeatable procedure I can refer to when working with my clients.
The procedure works like this:
- Test the site in GTmetrix before you start. This will give us a page-speed overview and a waterfall.
- Set up a pullzone in you BunnyNet account and a corresponding “cdn.” subdomain for your site (like cdn.your-site.com).
- Enable and test SSL for the pullzone.
- Configure BunnyNet caching and edge replication.
- Set up CORS and HTTP headers.
- Link your website to BunnyNet with the BunnyNet WordPress plugin.
- Configure the BunnyNet WP plugin, fonts and page assets.
- Test in GTmetrix – compare the waterfall now, with the waterfall from before we started. There should be multiple references to cdn.your-site.com in there now.
We’re going to use the Headwall WP Tutorials website as our working example.
Review the page-speed and page-load waterfall
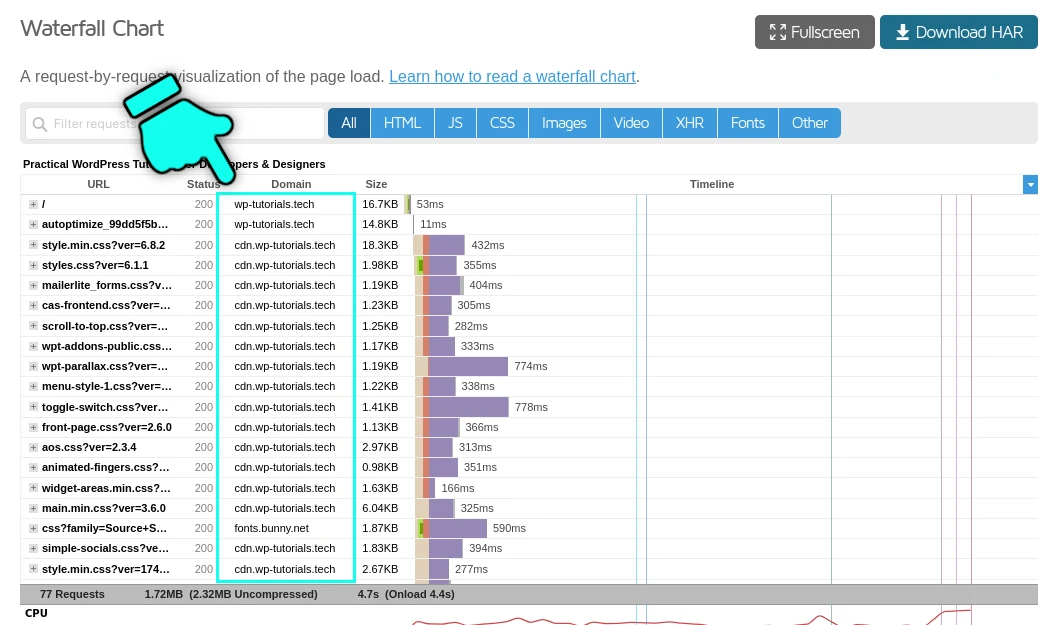
The first thing to do is create a starting point. I like to use GTmetrix to run page-speed analyses – it’s easy to use and their waterfall page is great.
Here’s our https://wp-tutorials.tech/ website’s waterfall. Notice we’re running the Autoptimize asset aggregation & minification plugin to reduce the number of JS & CSS files on each page-load.

Set up the BunnyNet pullzone
In your BunnyNet account, create a new pullzone for your site and set the origin URL as your website’s URL. This needs to be exactly right, so I recommend you open a browser tab, navigate to your website’s front page, then copy the URL from your browser’s address bar and paste it in to BunnyNet’s origin URL field.
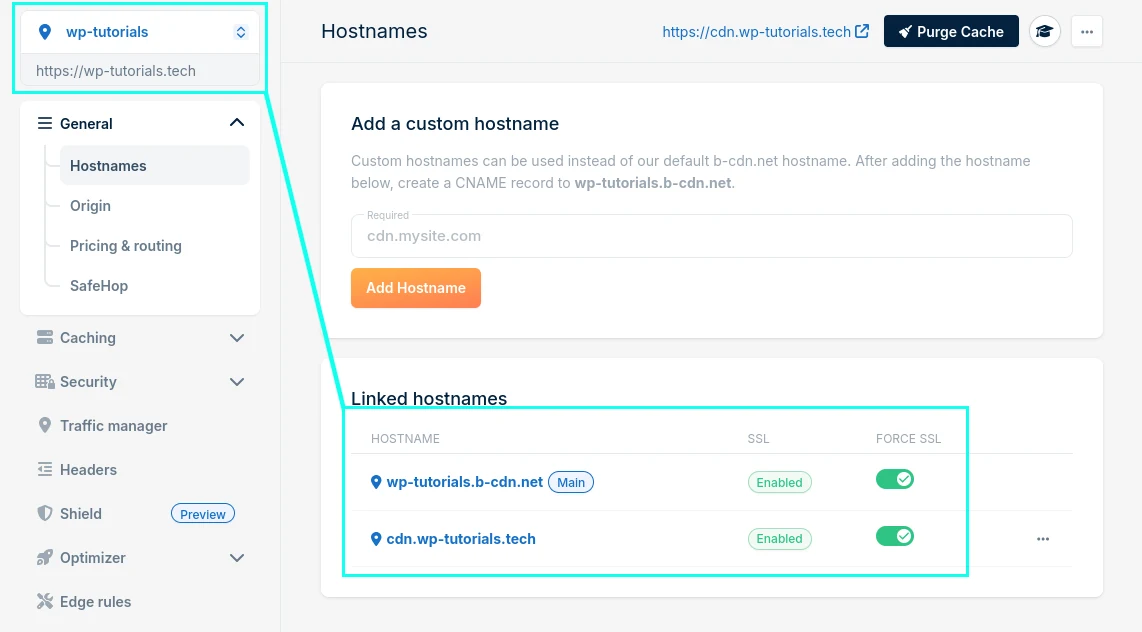
Now you can add a custom CDN host name. In this case I’ve used “cdn.wp-tutorials.tech”. If your site has a “www.” prefix, you can remove this before adding CDN. So if your origin URL is https://www.my-website.com your CDN host name would be “cdn.my-website.com”.
Follow the instructions for creating and validating the “cdn” CNAME record (it should only take a couple of minutes) and you should rend up with something like this:
Configure BunnyNet Caching
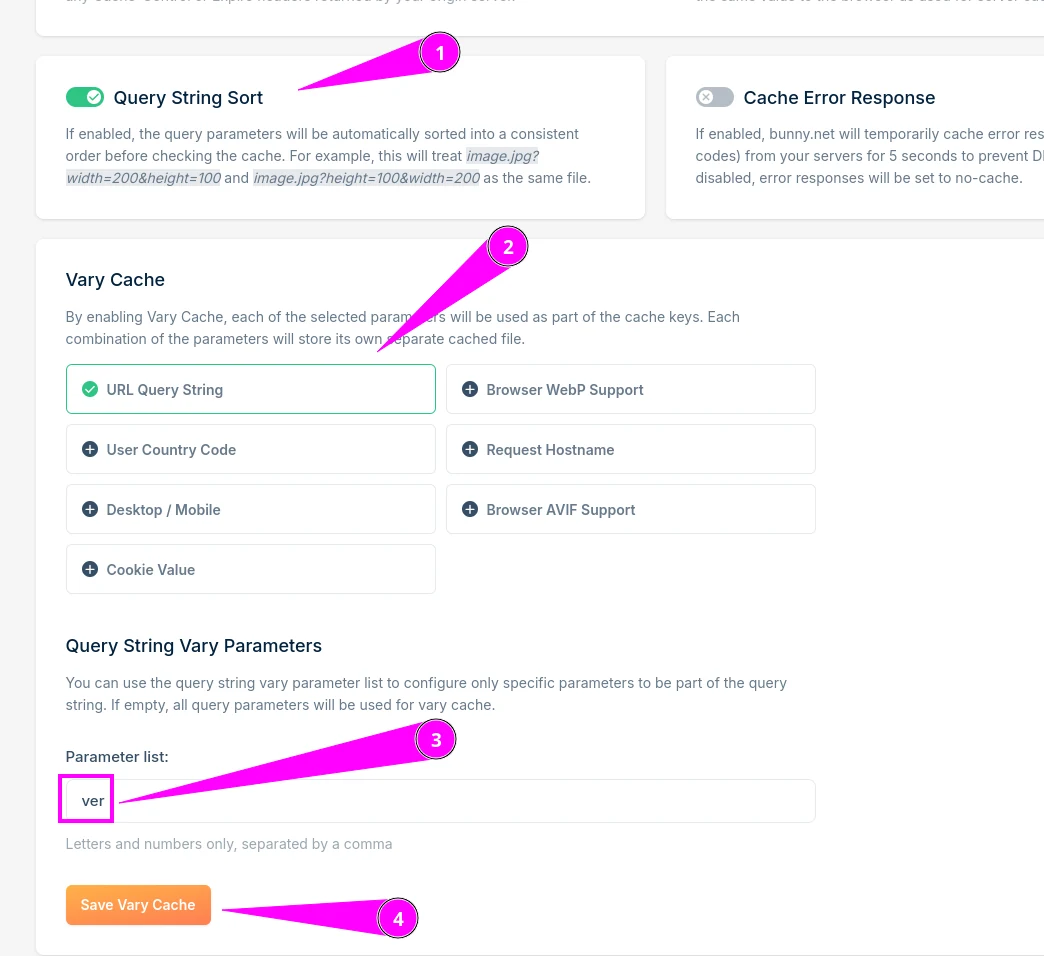
We need to make sure that assets with the same file name but different versions (in the query string) are treated differently by BunnyNet. Note the version number at the end…
- https://wp-tutorials.tech/wp-includes/js/wp-emoji-release.min.js?ver=6.8.1
- https://wp-tutorials.tech/wp-includes/js/wp-emoji-release.min.js?ver=6.8.2
In BunnyNet, go to Caching, enable Query String sorting and Vary URL Query String, with “ver” in the parameter list:
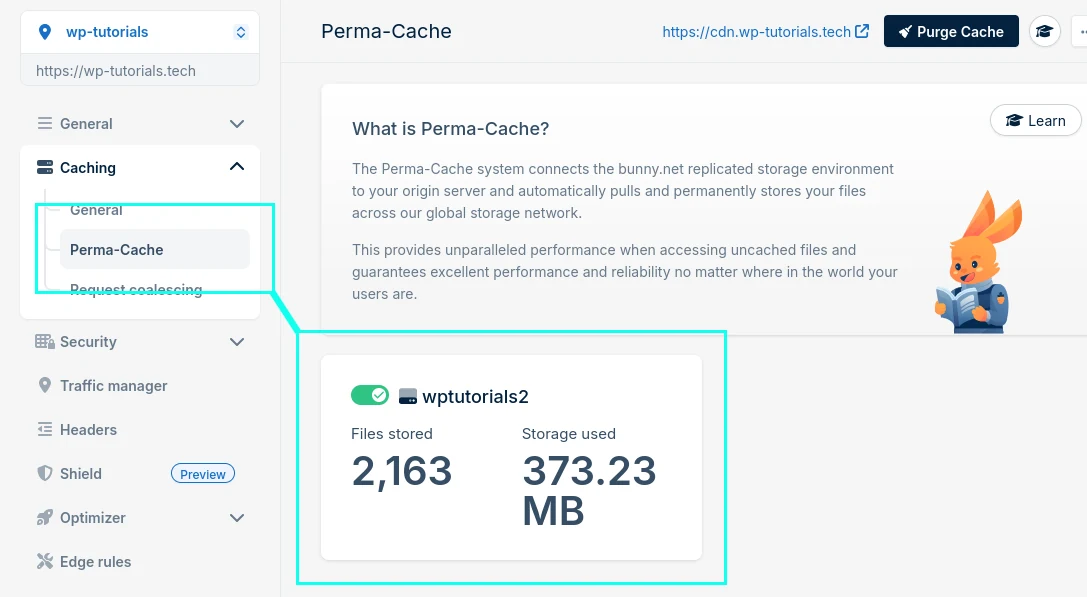
Storage zone and perma-cache
When a visitor requests an asset from cdn-your-sitecom (e.g. an image), BunnyNet will check to see if it has the image in its cache. If it doesn’t, BunnyNet will pull the image from the origin server (in this case, a Headwall Hosting server in London), save it in its edge cache, then deliver it to the visitor. BunnyNet’s perma-cache can automatically copy the image to all other edge cache nodes before other visitors request the asset. The upshot is that the act of someone visiting your site from Germany can seed your asset cache, so when someone from Australia visits, the site’ will ‘s asset will already be cached in a SE Asia edge-cache node.
First we need to create a storage zone in BunnyNet.
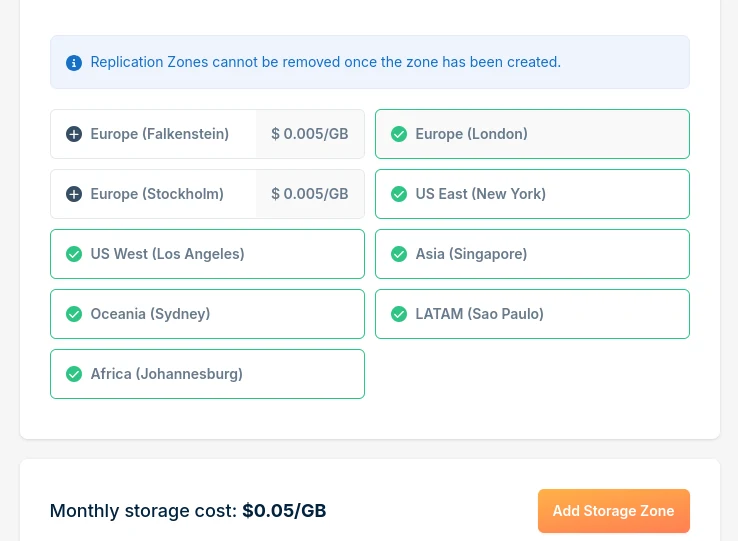
Next, select where in the world you want to replicate to. There is a direct financial cost to this section, so only enable all zones if you really need to do so.
Now we can connect the pullzone to the storage zone with the Perma-Cache settings.
First test
We’re ready to test the CDN’s basic configuration. We should now be able to reach most assets on your website with and without the “cdn.” prefix in the domain name. So both of these should work, with one of the going direct to the origin server, and the other going via BunnyNet:
- https://wp-tutorials.tech/wp-content/uploads/2024/08/responsive-wordpress-video-element-tutorial-1024×791.jpg
- https://cdn.wp-tutorials.tech/wp-content/uploads/2024/08/responsive-wordpress-video-element-tutorial-1024×791.jpg
If the regular URL is OK but “cdn.” URL doesn’t work, check your browser’s JS Console log to see what the error is. Likely issues are things like your BunnyNet account not being active, or your CNAME DNS not being set up correctly.
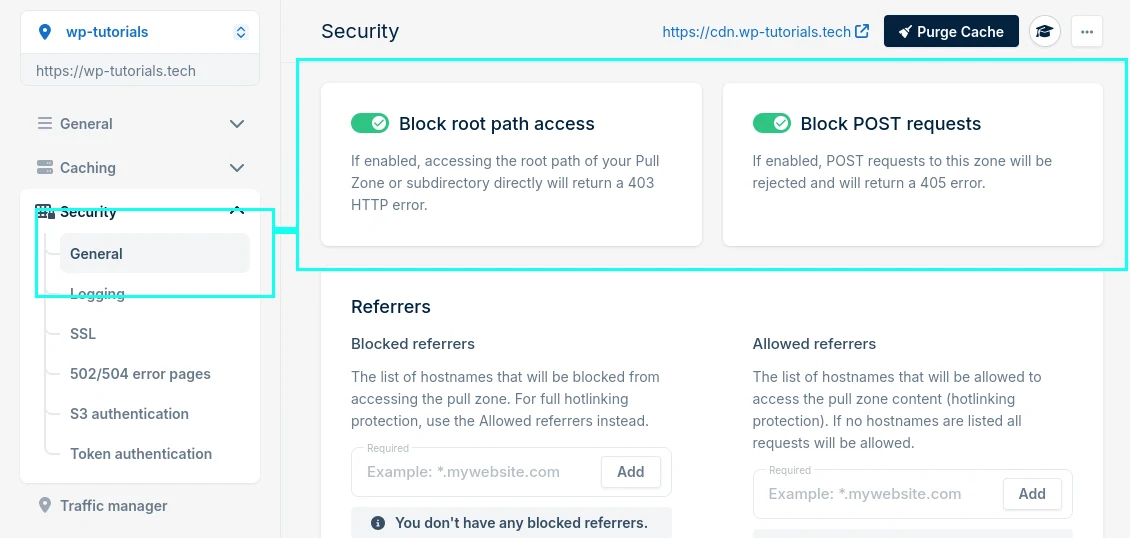
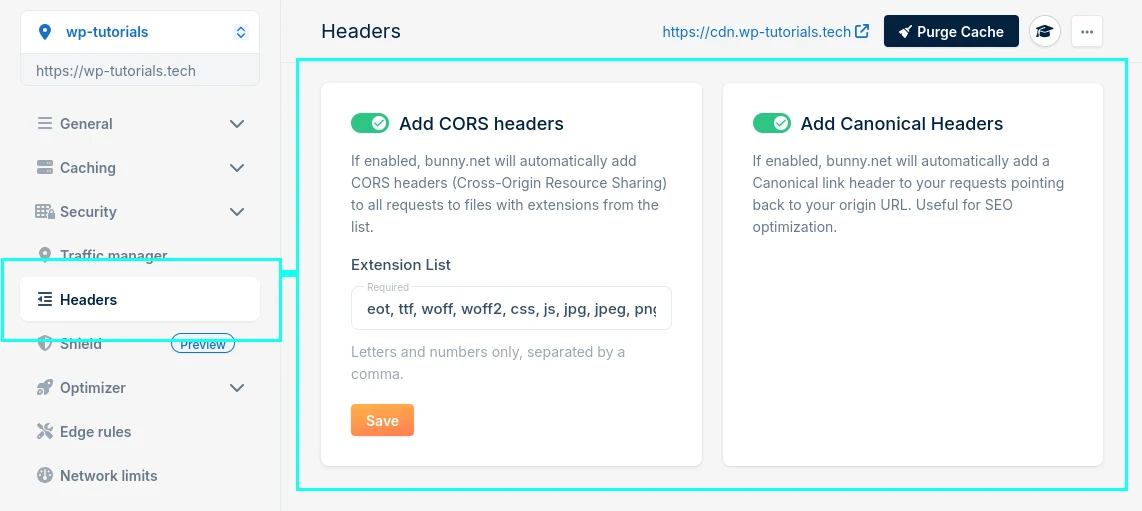
Security & CORS
First up, go to the Security section in your pullzone settings and enable the “Block root path” and “Block POST requests” options. The root path is your site’s front page (HTML) and POST requests (Ajax callbacks, form submissions and API calls) should always go direct to the origin server.
Now we can go to the Headers section and enable CORS. The extension list I use is:
eot, ttf, woff, woff2, css, js, jpg, jpeg, png, webp, gif, mp3, mp4, mpeg, svg, webm
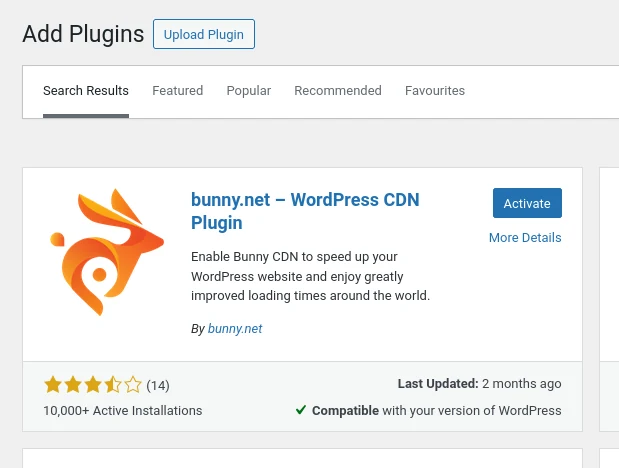
Install the BunnyNet WordPress plugin
Now we can configure your website to rewrite the asset URLs with your “cdn.” prefix. Go to your website’s Plugins area and install & activate the official BunnyNet plugin.
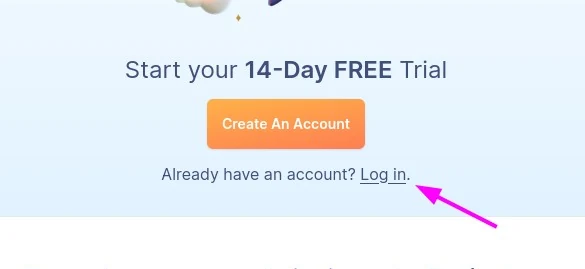
IMPORTANT: Make sure you have the main BunnyNet account open in another tab– not a subsidiary account. Otherwise you won’t be able to link the plugin to the site.
When prompted, click the “log in” button, because you already have a BunnyNet account.
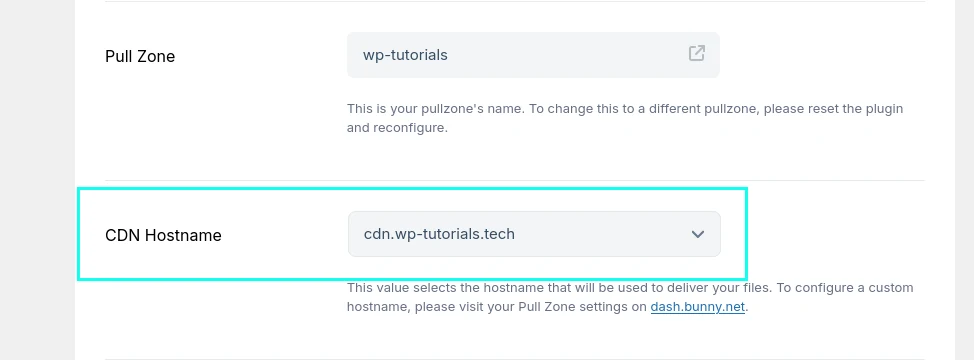
The configuration wizard should automatically detect that there is already a pullzone set up for your website’s domain. Make sure to select that option instead of creating a new pullzone.
In the plugin’s CDN settings section, choose your “cdn.” host name instead of the default “b-cdn.net” host name.
Save all the settings for the BunnyNet plugin.
Page caching: If you’re running a page cache plugin, you should flush your page cache now.
Test and tweak
We’re ready to run another test in GTmetrix. This time, lots of the values in the “Domain” column should read “cdn.your-site.com” instead of just “your-site.com”.
Notes
- I had to reconfigure the Autoptimize plugin to make it aware of the cdn.wp-tutorials.tech host name.
- I enabled the BunnyNet Rewrite Fonts option in their WP plugin, to replace Google Font references with links to BunnyNet’s CDN fonts.
- The first few page-loads might be slower than you expect. This is perfectly normal while the edge-cache builds up. It won’t take long for page-speeds to become much faster.
- Whenever you make changes to how your CDN is configured, flush your page cache before running any tests.
If there are any references in the waterfall that are coming from your-site.com, but should be coming form cdn.your-site.com, work through them one-by-one. If the URL isn’t being rewritten to use the “cdn.” prefix, it’s usually because of a plugin or theme setting.
There’s more information on using GTmetrix to diagnose page-speed issues here:
If you’re a Headwall Hosting customer, we can help you with most of this procedure to get your page running super-fast for a worldwide audience.